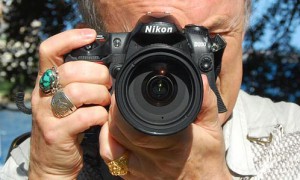
Get rid of blurry photos due to camera shake: hold your DSLR steady using these tips from Tony Page of Travel Signposts Photo. You can get sharp photos at surprisingly slow shutter speeds if you follow a few simple steps.
“Hi everyone, let’s talk about the Dreaded Curse of the Blurry Photographs. Hey, we’ve all done it. We’ve just taken that marvellous photograph, just right, maybe it even looked good on the back of our camera on the LCD. And we go home, blow it up on the computer – boom – blurred! It’s really disappointing, isn’t it? But you know you, you can get round this in a lot of ways.The Reason Why
Why is it blurred? Well of course, it can be out of focus, but let’s leave that aside for the moment and deal with that later. Maybe because you used too slow a shutter speed, maybe the subject was movingly too quickly, maybe you’ve used too big a magnification on your telephoto lens. There’s a common factor in all of this, and that is: Movement. Today we’re going to talk about camera movement, and you know, often the simplest solutions can be the best. So let’s look at the most basic thing, how you’re holding in camera, because if you’re not holding your camera steady, your shots are not going to be sharp. A small movement at the camera can mean a big movement at the subject that you are actually taking, and that can easily lead to blur.
Let’s look at the DSLR
Okay, there are two main cameras we’re all using, right? The DSLR(the single lens reflex) and of course the Point-and-Shoot. Let’s split this into two, and first of all talk about the DSLR, because it’s more straightforward! Most pros like a heavy DSLR and there’s a reason for that, because frankly it’s a lot easier to hold a heavy camera steady than it is to hold a light one. That’s why, for example, point and shoots are so difficult to hold steady.
All right, let’s look at the DSLR. Most of them nowadays have a grip on the right-hand side, so there’s a tendency just to hold the camera in one hand. Of course the shutter button is also operated by the same hand, and there’s a problem there. Because in fact it’s more liable to lead to shake if you’re just operating things with one hand without proper support. So the way I do it is to take the weight of the camera in your left hand – go on, weigh it in your hand – and then you move your right hand in and use that to operate the shutter button. And you know by taking most of the weight in your left hand you can actually operate the shutter more smoothly – squeeze it gently!
Nowadays you’ll also be able to use the zoom but you could also focus with the fingers of your left hand as well. So try it. I know it’s easier – I do it myself – you hold the camera when you’re wandering around, you hold it in the right-hand grip but when you’re actually shooting transfer the weight to your left. Honestly, you will find it does work better and you get steadier shots.
Stage Two is to look through the viewfinder
Right, so now we’ve got a good firm grip on the camera. Stage two is to look through the viewfinder and this gives us another chance to further stabilize our camera, because we can press it against our forehead. I’m not saying you use some kind of death grip and ram it against your forehead with power, just hold it firmly against your forehead, and while you’re at it, no flying with the elbows, get them in to the side of your body, and stabilize them against your body. Think about it, basically what you’re doing is making a tripod out of your two elbows and your forehead, you’re actually holding the camera more firmly that way.
Now of course, if you’re not standing firmly on your two feet, the whole thing is a waste of time. If you’re wavering around on one foot or with one foot slightly up on a rock and you can’t stand straight, it’s a waste of space because you basically you’re going to be wavering around anyway no matter how firmly you hold the camera at the other end of your body.
Don’t breathe in!
Okay, so now you’ve got your feet firmly planted, you’re holding your camera firmly against your forehead, and you’ve got your elbows into your sides. Now, breathing. A lot of people have different opinions about this. I’ll tell you what I do. When I’m taking a shot, I breath out, I take the photograph and then I breathe in. I find that if you’ve had a good breath, and then you’re breathing out, you tend to be more relaxed whereas if you’re holding your breath, you tend to have a bit of tension there. But your mileage may vary.
Well, that’s about it for holding the DSLR steady. Next time, the Point-and-Shoot, or more politely, the compact camera. Until then, this is Tony Page from Travel Signposts Photo wishing you: Good Shooting!“
What's your opinion on this?

 Guerrilla Travel Photography eBook
 Take Better Digital Photos eBook
Leave a Reply